此文章是基于 Vue 2 版本
先看个例子:
var vm = new Vue({
  props: {
    rootProp: Boolean
  },
  data {
    a: '',
    b: ''
  },
  computed: {
    rootCompute () {
      return ''
    }
  },
  watch: {
    rootWatcher (newVal, oldVal) {}
  },
  method: {}
})
在上面的代码中,我们创建了一个Vue实例,并且我们给了它一个选项对象来进行初始化。
下面我们将根据Vue源码来说明Vue是如何实现响应式的。
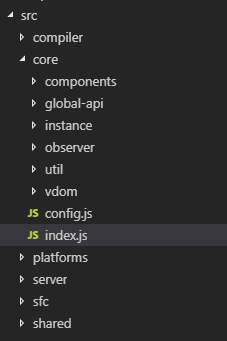
# Vue项目结构
在github上将Vue的源码clone到本地,我们可以看到,Vue的源码目录结构主要如下:
# Vue入口文件
Vue在入口文件是src/core/index.js,其中简化的代码如下:
// src/core/index.js
import Vue from './instance/index'
// ...
export default Vue
从代码中,我们可以发现,在这个文件中,我们导出了一个Vue实例。那么初始化Vue实例则是在src/core/instance/index.js文件中完成的。
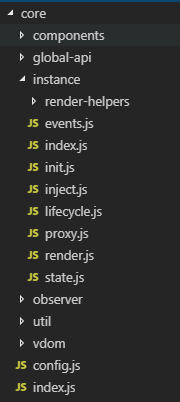
# Vue实例的初始化
Vue实例的初始化包括一系列的数据初始化,它的目录结构如下:
来到index.js中
// src/core/instance/index.js
import { initMixin } from './init'
function Vue (options) {
  // ...
  this._init(options)
}
initMixin(Vue)
// ...
export default Vue
从代码中,我们可以看出Vue是一个构造函数,创建Vue实例时,我们会执行_init函数,那么 _init函数到底做了什么?又定义在哪呢?在说_init函数之前,我们先来看看initMixin函数。
initMixin函数是在创建实例之前就执行多的,我们来看看initMixin函数。
// src/core/instance/init.js
import { initState } from './state'

export function initMixin (Vue: Class<Component>) {
  Vue.prototype._init = function (options?: Object) {
    const vm: Component = this
    initLifecycle(vm) // vm 生命周期相关变量初始化操作
    initEvents(vm)    // vm 事件相关初始化
    initRender(vm)    // 模板解析相关初始化
    callHook(vm, 'beforeCreate') // 调用 beforeCreate 钩子函数
    initInjections(vm) // resolve injections before data/props
    initState(vm)  // vm 状态初始化
    initProvide(vm) // resolve provide after data/props
    callHook(vm, 'created') // 调用 created 钩子函数
  }
}
从这里我们可以看出,Vue构造函数中的_init函数在这里有定义, 所以运行new Vue()时, _init函数就会进行一系列的初始化,包括Vue实例的生命周期,事件、数据等
我们的重点在initState(vm),里面实现了props, methods,data,computed,watch的初始化操作。我们来看看源码
// src/core/instance/state.js
import Watcher from '../observer/watcher'
import { pushTarget, popTarget } from '../observer/dep'

import { observe } from '../observer/index'

export function initState (vm: Component) {
  vm._watchers = []
  const opts = vm.$options
  if (opts.props) initProps(vm, opts.props)
  if (opts.methods) initMethods(vm, opts.methods)
  if (opts.data) {
    initData(vm)
  } else {
    observe(vm._data = {}, true /* asRootData */)
  }
  if (opts.computed) initComputed(vm, opts.computed)
  if (opts.watch && opts.watch !== nativeWatch) {
    initWatch(vm, opts.watch)
  }
}
代码中的vm.$options就是选项对象,它也是在_init函数中赋值的。
根据代码,我们也可以得到选项对象初始化的顺序:

我们先来说说data的初始化
# 初始化Data
熟悉Vue的朋友都知道,在Vue组件中,data被要求是一个函数,所以对于data的初始化是执行initData(vm)函数。
// src/core/instance/state.js
import { observe } from '../observer/index'
function initData(vm: Component) {
  //...
  observe(data, true /* asRootData */)
}
代码中observe是在其他地方定义的,它的参数data是组件中data函数的返回值,比如上面的例子,此时参数data就是对象{ a: '', b: '' }
那我们接着来看observe函数
# Observer(观察者)
// src/core/observe/index.js
export function observe (value: any, asRootData: ?boolean): Observer | void {
  let ob: Observer | void
  ob = new Observer(value)
  return ob
}
其中,observe实例化了Observer对象,参数为对象{ a: '', b: '' }。
现在我们来看看Observer做了什么
// src/core/observe/index.js
import Dep from './dep'

export class Observer {
  value: any;
  dep: Dep;
  vmCount: number; // number of vms that have this object as root $data
  constructor (value: any) {
    this.value = value
    this.dep = new Dep()
    this.vmCount = 0
    if (Array.isArray(value)) {
      // ...
    } else {
      this.walk(value)
    }
  }
  // 遍历对象,通过 defineProperty 函数实现双向绑定
  walk (obj: Object) {
    const keys = Object.keys(obj)
    for (let i = 0; i < keys.length; i++) {
      defineReactive(obj, keys[i])
    }
  }
  // ...
}
类Observer在初始化时保存了传进来的data,并且实例化了一个Dep。
当data为对象时,调用了walk函数, 遍历了对象的每个属性,并且调用了defineReactive函数,对每个属性实现双向绑定。
下面我们来看看defineReactive的具体实现
// Define a reactive property on an Object.
export function defineReactive (
  obj: Object,
  key: string,
  val: any,
  customSetter?: ?Function,
  shallow?: boolean
) {
  const dep = new Dep()

  const property = Object.getOwnPropertyDescriptor(obj, key)

  const getter = property && property.get
  const setter = property && property.set
  if ((!getter || setter) && arguments.length === 2) {
    val = obj[key]
  }
  let childOb = !shallow && observe(val)
  Object.defineProperty(obj, key, {
    enumerable: true,
    configurable: true,
    // 拦截 getter,当取值时会触发该函数
    get: function reactiveGetter () {
      const value = getter ? getter.call(obj) : val
      if (Dep.target) {
        dep.depend()
        // ...
      }
      return value
    },
    // 拦截 setter,当赋值时会触发该函数
    set: function reactiveSetter (newVal) {
      const value = getter ? getter.call(obj) : val
      // ...
      if (getter && !setter) return
      if (setter) {
        setter.call(obj, newVal)
      } else {
        val = newVal
      }
      // ...
      dep.notify()
    }
  })
}
defineReactive函数利用了Object.defineProperty()对对象属性进行了重写,并且每个属性都有一个Dep实例
在Object.defineProperty中自定义get和set函数,并在get中进行依赖收集,在set中派发更新。
其中,dep是Dep的实例,那Dep到底是什么呢?
—— Dep其实是一个订阅者的管理中心,管理着所有的订阅者
下面我们来看看Dep
# Dep(订阅者管理中心)
给data属性添加订阅者有一个前提条件 —— Dep.target存在,那Dep.target是什么呢?
我们来看src/core/observe/dep.js中关于Dep的代码:
// src/core/observe/dep.js
export default class Dep {
  static target: ?Watcher;
  id: number;
  subs: Array<Watcher>;

  constructor () {
    this.id = uid++
    this.subs = []
  }
  // 添加观察者
  addSub (sub: Watcher) {
    this.subs.push(sub)
  }
  // 移除观察者
  removeSub (sub: Watcher) {
    remove(this.subs, sub)
  }

  depend () {
    if (Dep.target) {
      // 调用 Watcher 的 addDep 函数
      Dep.target.addDep(this)
    }
  }
  // 派发更新
  notify () {
    // stabilize the subscriber list first
    const subs = this.subs.slice()
    // ...
    for (let i = 0, l = subs.length; i < l; i++) {
      subs[i].update()
    }
  }
}

Dep.target = null
const targetStack = []

export function pushTarget (target: ?Watcher) {
  targetStack.push(target)
  Dep.target = target
}
从代码中,我们可以发现:
- 在
Dep中分别定义了get和set中需要用的depend和notify函数,并且可以发现depend是添加一个订阅者,notify是用来更新订阅者的 Dep通过静态属性target来控制在同一时间内只有一个观察者,并且通过pushTarget来给target属性赋值。Dep中方法主要是对Watcher队列进行增加、移除,所以Dep其实是Watcher管理中心,管理着所有的Watcher。
下面我们来看看Watcher:
# Watcher(订阅者)
// src/core/observe/watcher.js
import Dep, { pushTarget, popTarget } from './dep'

export default class Watcher {
  // ...
  id: number
  constructor (options) {
  // ...
    this.id = ++uid
  }
  addDep (dep: Dep) {
    const id = dep.id
    if (!this.newDepIds.has(id)) {
      this.newDepIds.add(id)
      this.newDeps.push(dep)
      if (!this.depIds.has(id)) {
        dep.addSub(this)
      }
    }
  }

  update () {
    /* istanbul ignore else */
    if (this.lazy) {
      this.dirty = true
    } else if (this.sync) {
      this.run()
    } else {
      // 一般会进入这里
      queueWatcher(this)
    }
  }
}
// src/core/observe/scheduler.js
let flushing = false
export function queueWatcher (watcher: Watcher) {
  const id = watcher.id
  // 判断 Watcher 是否 push 过
  // 因为存在改变了多个数据,多个数据的 Watch 是同一个
  if (has[id] == null) {
    has[id] = true
    if (!flushing) {
      // 最初会进入这个条件
      queue.push(watcher)
    } else {
      // 在执行 flushSchedulerQueue 函数时,如果有新的派发更新会进入这里
      // 插入新的 watcher
      let i = queue.length - 1
      while (i > index && queue[i].id > watcher.id) {
        i--
      }
      queue.splice(i + 1, 0, watcher)
    }
    // 最初会进入这个条件
    if (!waiting) {
      waiting = true

      if (process.env.NODE_ENV !== 'production' && !config.async) {
        flushSchedulerQueue()
        return
      }
      // 将所有 Watcher 统一放入 nextTick 调用
      // 因为每次派发更新都会引发渲染
      nextTick(flushSchedulerQueue)
    }
  }
}

function flushSchedulerQueue () {
  currentFlushTimestamp = getNow()
  flushing = true
  let watcher, id

  // 根据 id 排序 watch,确保:
  // 1. 组件更新从父到子
  // 2. 用户写的 Watch 先于渲染 Watch
  // 3. 如果在父组件 watch run 的时候有组件销毁了,这个 Watch 可以被跳过
  queue.sort((a, b) => a.id - b.id)

  // 不缓存队列长度,因为在遍历的过程中可能队列的长度发生变化
  for (index = 0; index < queue.length; index++) {
    watcher = queue[index]
    if (watcher.before) {
      // 执行 beforeUpdate 钩子函数
      watcher.before()
    }
    id = watcher.id
    has[id] = null
    // 在这里执行用户写的 Watch 的回调函数并且渲染组件
    watcher.run()
    // 判断无限循环
    // 比如在 watch 中又重新给对象赋值了,就会出现这个情况
    if (process.env.NODE_ENV !== 'production' && has[id] != null) {
      circular[id] = (circular[id] || 0) + 1
      if (circular[id] > MAX_UPDATE_COUNT) {
        // ...
        break
      }
    }
  }
在派发更新的全过程中,核心流程就是给对象赋值,触发set中的派发更新函数。将所有Watcher都放入nextTick中进行更新,nextTick回调中执行用户Watch的回调函数并且渲染组件。
# 总结
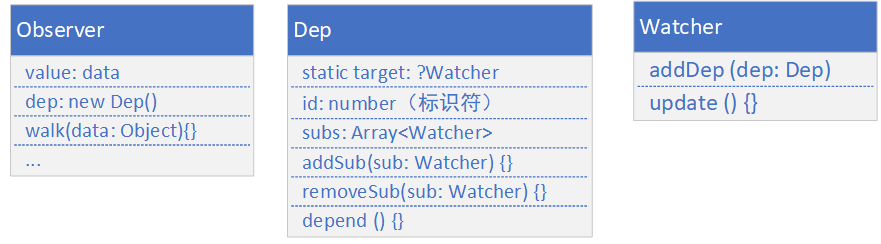
Vue中数据响应原理主要涉及到下面几个类

下图是类中的一些属性和方法
- 下图是几个类的关联
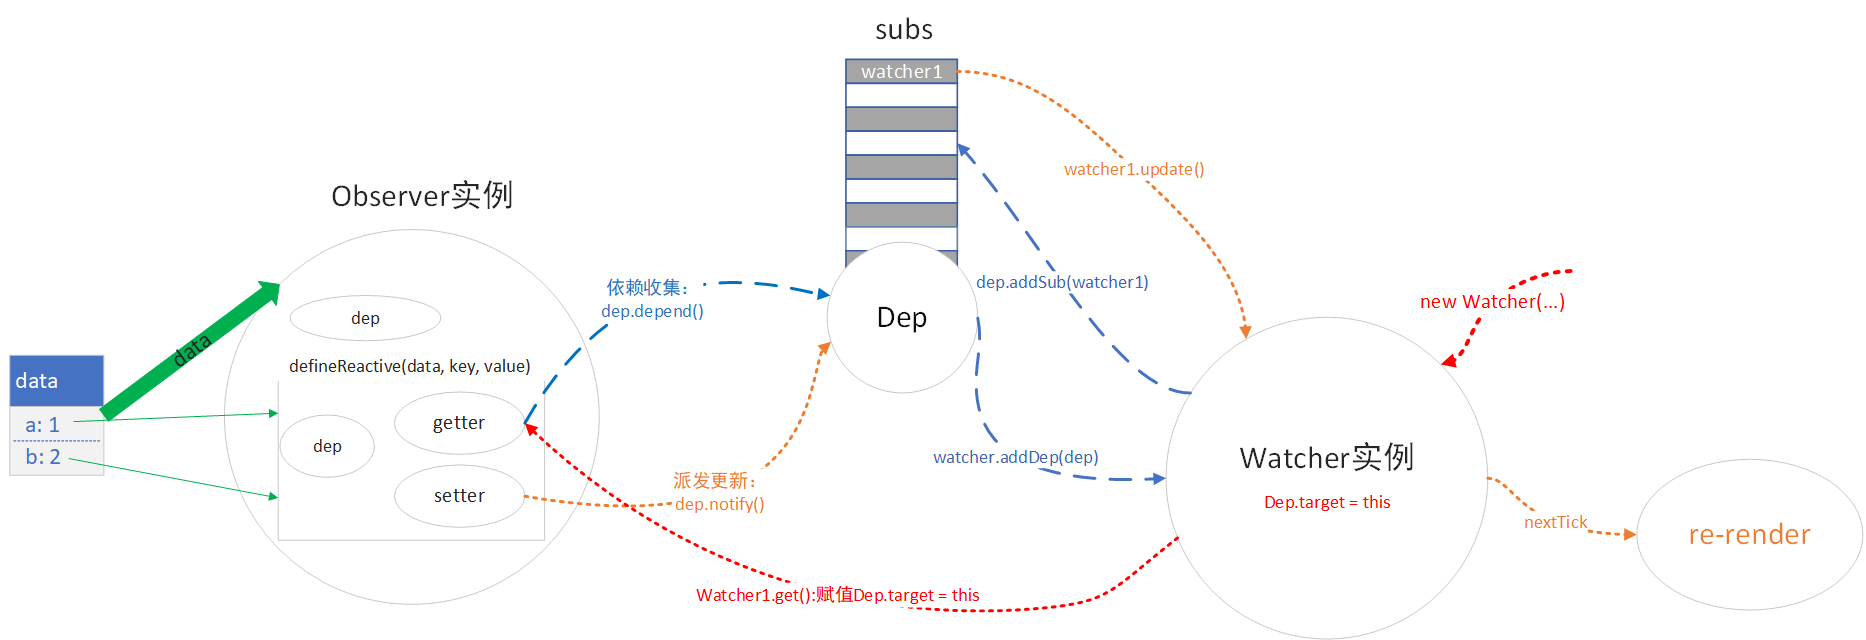
- 图中的红色箭头是
Watcher的实例化。在实例化的过程中,会调用方法get来设置Dep.target为当前Watcher实例,并且触发观察对象的getter方法,进行依赖收集。 - 图中的蓝色箭头是依赖收集的过程。观察对象的
getter方法被触发,经过dep.depend()、Dep.target.addDep()和dep.addSub()等方法,会将当前观察对象的dep实例添加到Watcher实例的deps中,并且将当前Watcher实例添加到Dep的属性subs中进行统一管理。 - 图中的黄色箭头是派发更新过程。当观察对象改变后,会调用
dep.notify()方法,触发subs中当前的watcher1实例的update方法,最后会重新渲染。